Prompt Manager
Supervertaler includes a Prompt Manager so you can create, organise, and reuse prompts across projects. It lives in the ✨ AI tab → Prompt Manager sub-tab.
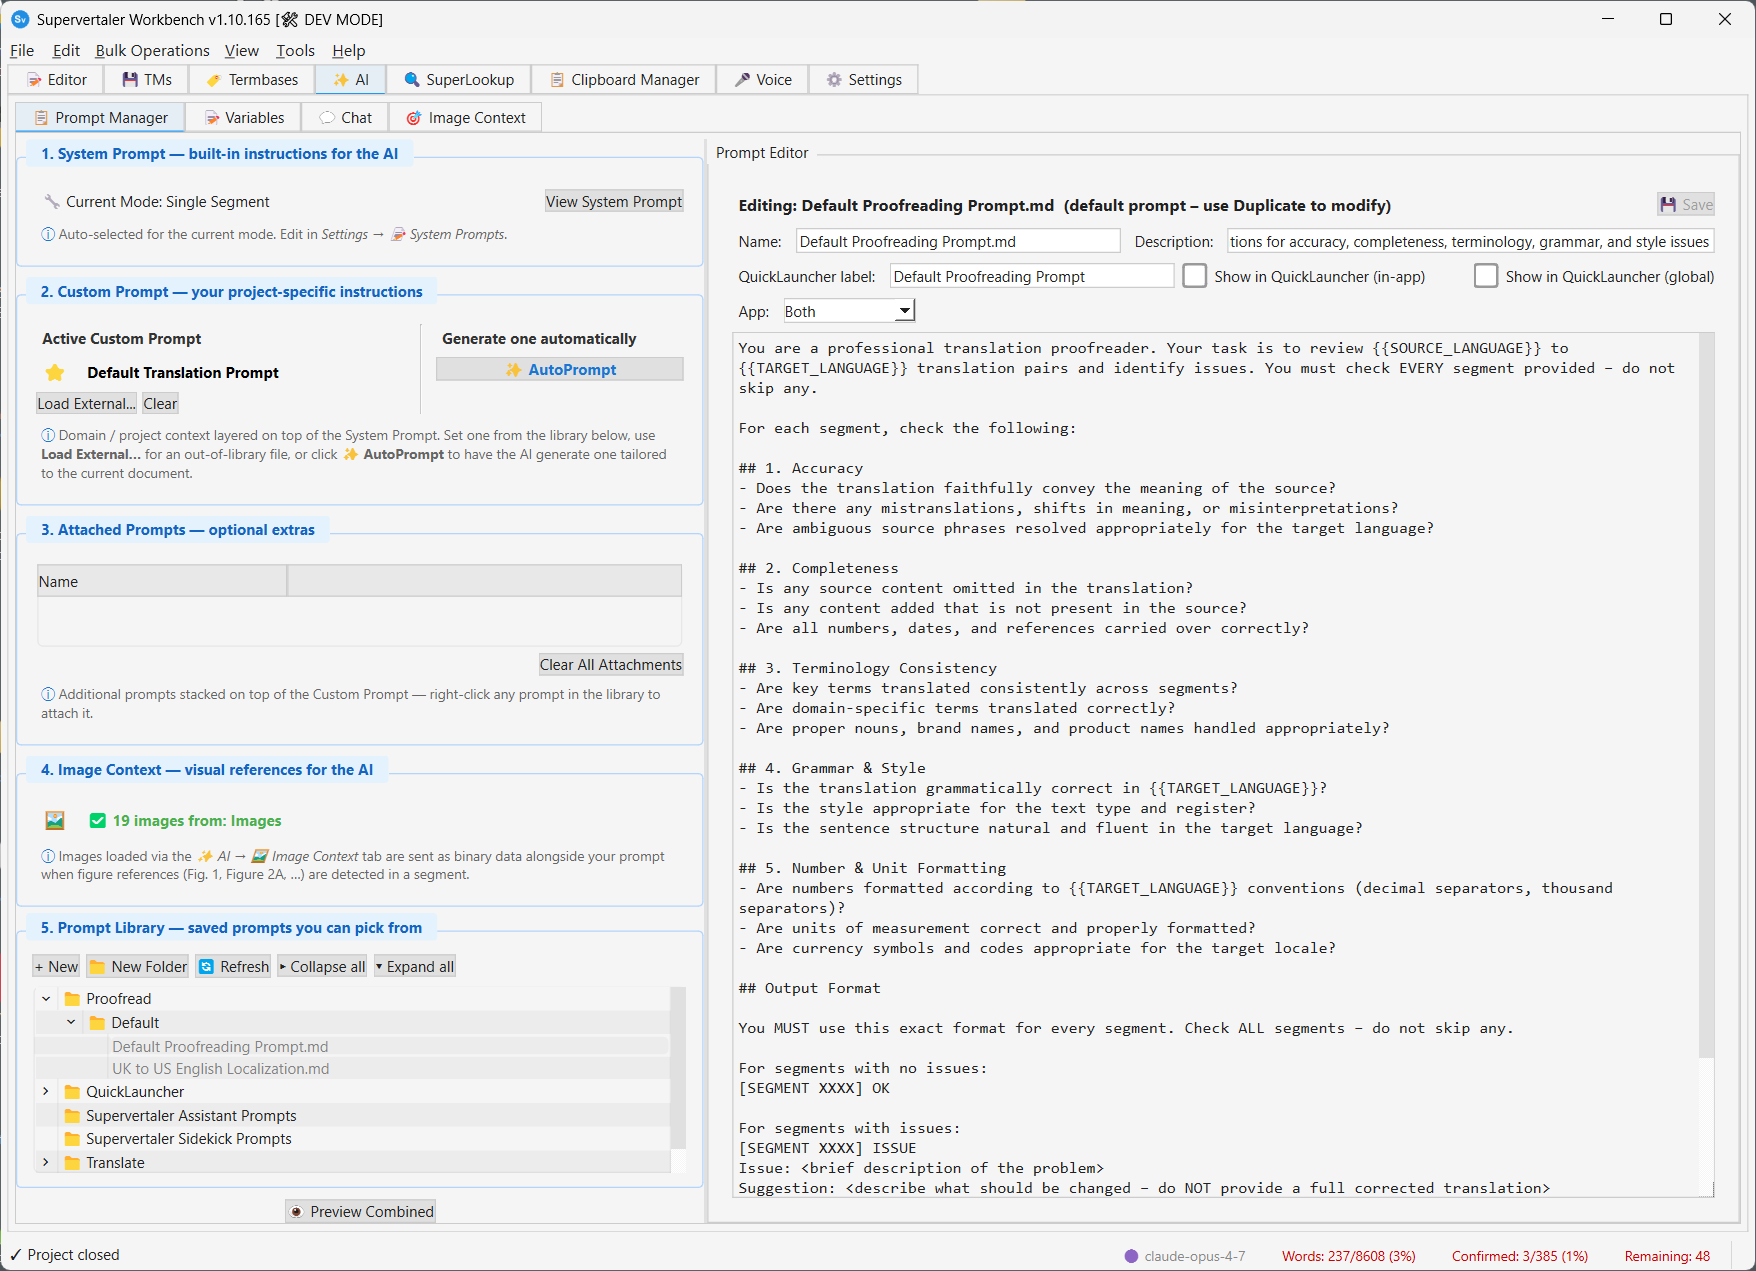
Layout
The left side of the Prompt Manager is organised into five numbered sections, each with a coloured title strip. Read top to bottom, they are the four context layers that go into every AI request, followed by the library you pick prompts from:
| # | Section | What lives there |
|---|---|---|
| 1 | System Prompt | The built-in instructions for the AI. Auto-selected based on the current mode (Single Segment, Batch DOCX, Batch Bilingual). Click View System Prompt to see what it looks like and to jump to Settings → 📝 System Prompts if you want to edit it. |
| 2 | Custom Prompt | Your project-specific instructions, in two columns: the active prompt on the left (with Load External… and Clear), and the ✨ AutoPrompt button on the right. Set one from the library below, load an out-of-library file, or have the AI generate one. |
| 3 | Attached Prompts | Optional extras stacked on top of the Custom Prompt. Right-click any prompt in the library and choose 📎 Attach to Active to add it here. Clear All Attachments removes them all. |
| 4 | Image Context | Visual references for the AI. Click the green Open ▸ button to swap the right-hand panel from the Prompt Editor to the Image Context viewer, where you can extract images from a DOCX or load a pre-existing folder of figure images. Once loaded, images are sent as binary data alongside your prompt when figure references (Fig. 1, Figure 2A, …) are detected in a segment. The viewer’s ← Back to Prompt Editor button (or simply clicking any prompt in Section 5) returns you to the Prompt Editor. |
| 5 | Prompt Library | All your saved prompts. The button row below the heading lets you create new entries (+ New, 📁 New Folder), refresh from disk, and collapse / expand every folder. |
At the very bottom of the panel sits a single 👁 Preview Combined button that opens a window showing exactly what will be sent to the AI for the current segment – the System Prompt, your Custom Prompt, every Attached Prompt, plus the segment text itself, all assembled in order.
Setting the Custom Prompt
Three ways to populate Section 2:
- From the library – right-click any prompt in Section 5 and choose ⭐ Set as Custom Prompt, or double-click it. The prompt name shows up next to the ⭐ icon in Section 2.
- From an external file – click Load External… in Section 2 and pick any
.mdor.txtfile from anywhere on your computer. The file stays where it is on disk; Supervertaler just references it. - Have the AI generate one – click ✨ AutoPrompt in Section 2. The AI analyses your current document (domain, tone, terminology, confirmed translations) and produces a tailored prompt. See AutoPrompt for details.
Whichever way you pick, the choice is saved into the .svproj immediately, so it survives a restart.
Common uses
- Maintain different prompts per client
- Maintain different prompts per domain
- Switch between “draft” and “final” translation styles
- Pair a domain-specific Custom Prompt with one or two client-specific Attached Prompts (e.g. a “patents” Custom Prompt plus a “Client X house style” attachment)
Tips
- Start simple and evolve prompts as you learn what works for your language pair.
- AutoPrompt is a good starting point for new projects, especially in unfamiliar domains – use the auto-generated prompt as a draft and edit it from there.
- Preview Combined is honest – it shows you the actual final prompt that will be sent. If something looks wrong, it’s because something is wrong.
- External prompts can be edited in place – if you load a prompt from an external file, Supervertaler can show it in the editor on the right and save changes back to the same file.
See also
- AutoPrompt – auto-generate a tailored translation prompt from the current document
- Creating Prompts – what makes a good translation prompt when writing one by hand
- AI Translation Overview – how the assembled prompt is used during translation