Supervertaler Sidekick: Docs for the Sidekick system-wide toolbox only
# Supervertaler Sidekick
Supervertaler Sidekick is the system-wide toolbox for translators. Where [Supervertaler for Trados](/trados/) and [Supervertaler for memoQ](/memoq/) work inside your CAT tool, Sidekick works everywhere else – and inside the CAT tool too. Select text in any Windows application – a CAT tool, a browser, a PDF, an email, a chat window – press `` ` `` (backtick), and act on it: look it up across a dozen terminology sources, translate it with several engines at once, run an AI prompt over it, change its case, wrap it in quotes, or paste a snippet in its place. It is free – no licence key, no account – and source-available: you can read and check the code, but not redistribute it. The source is at [github.com/Supervertaler/Supervertaler-Sidekick](https://github.com/Supervertaler/Supervertaler-Sidekick). 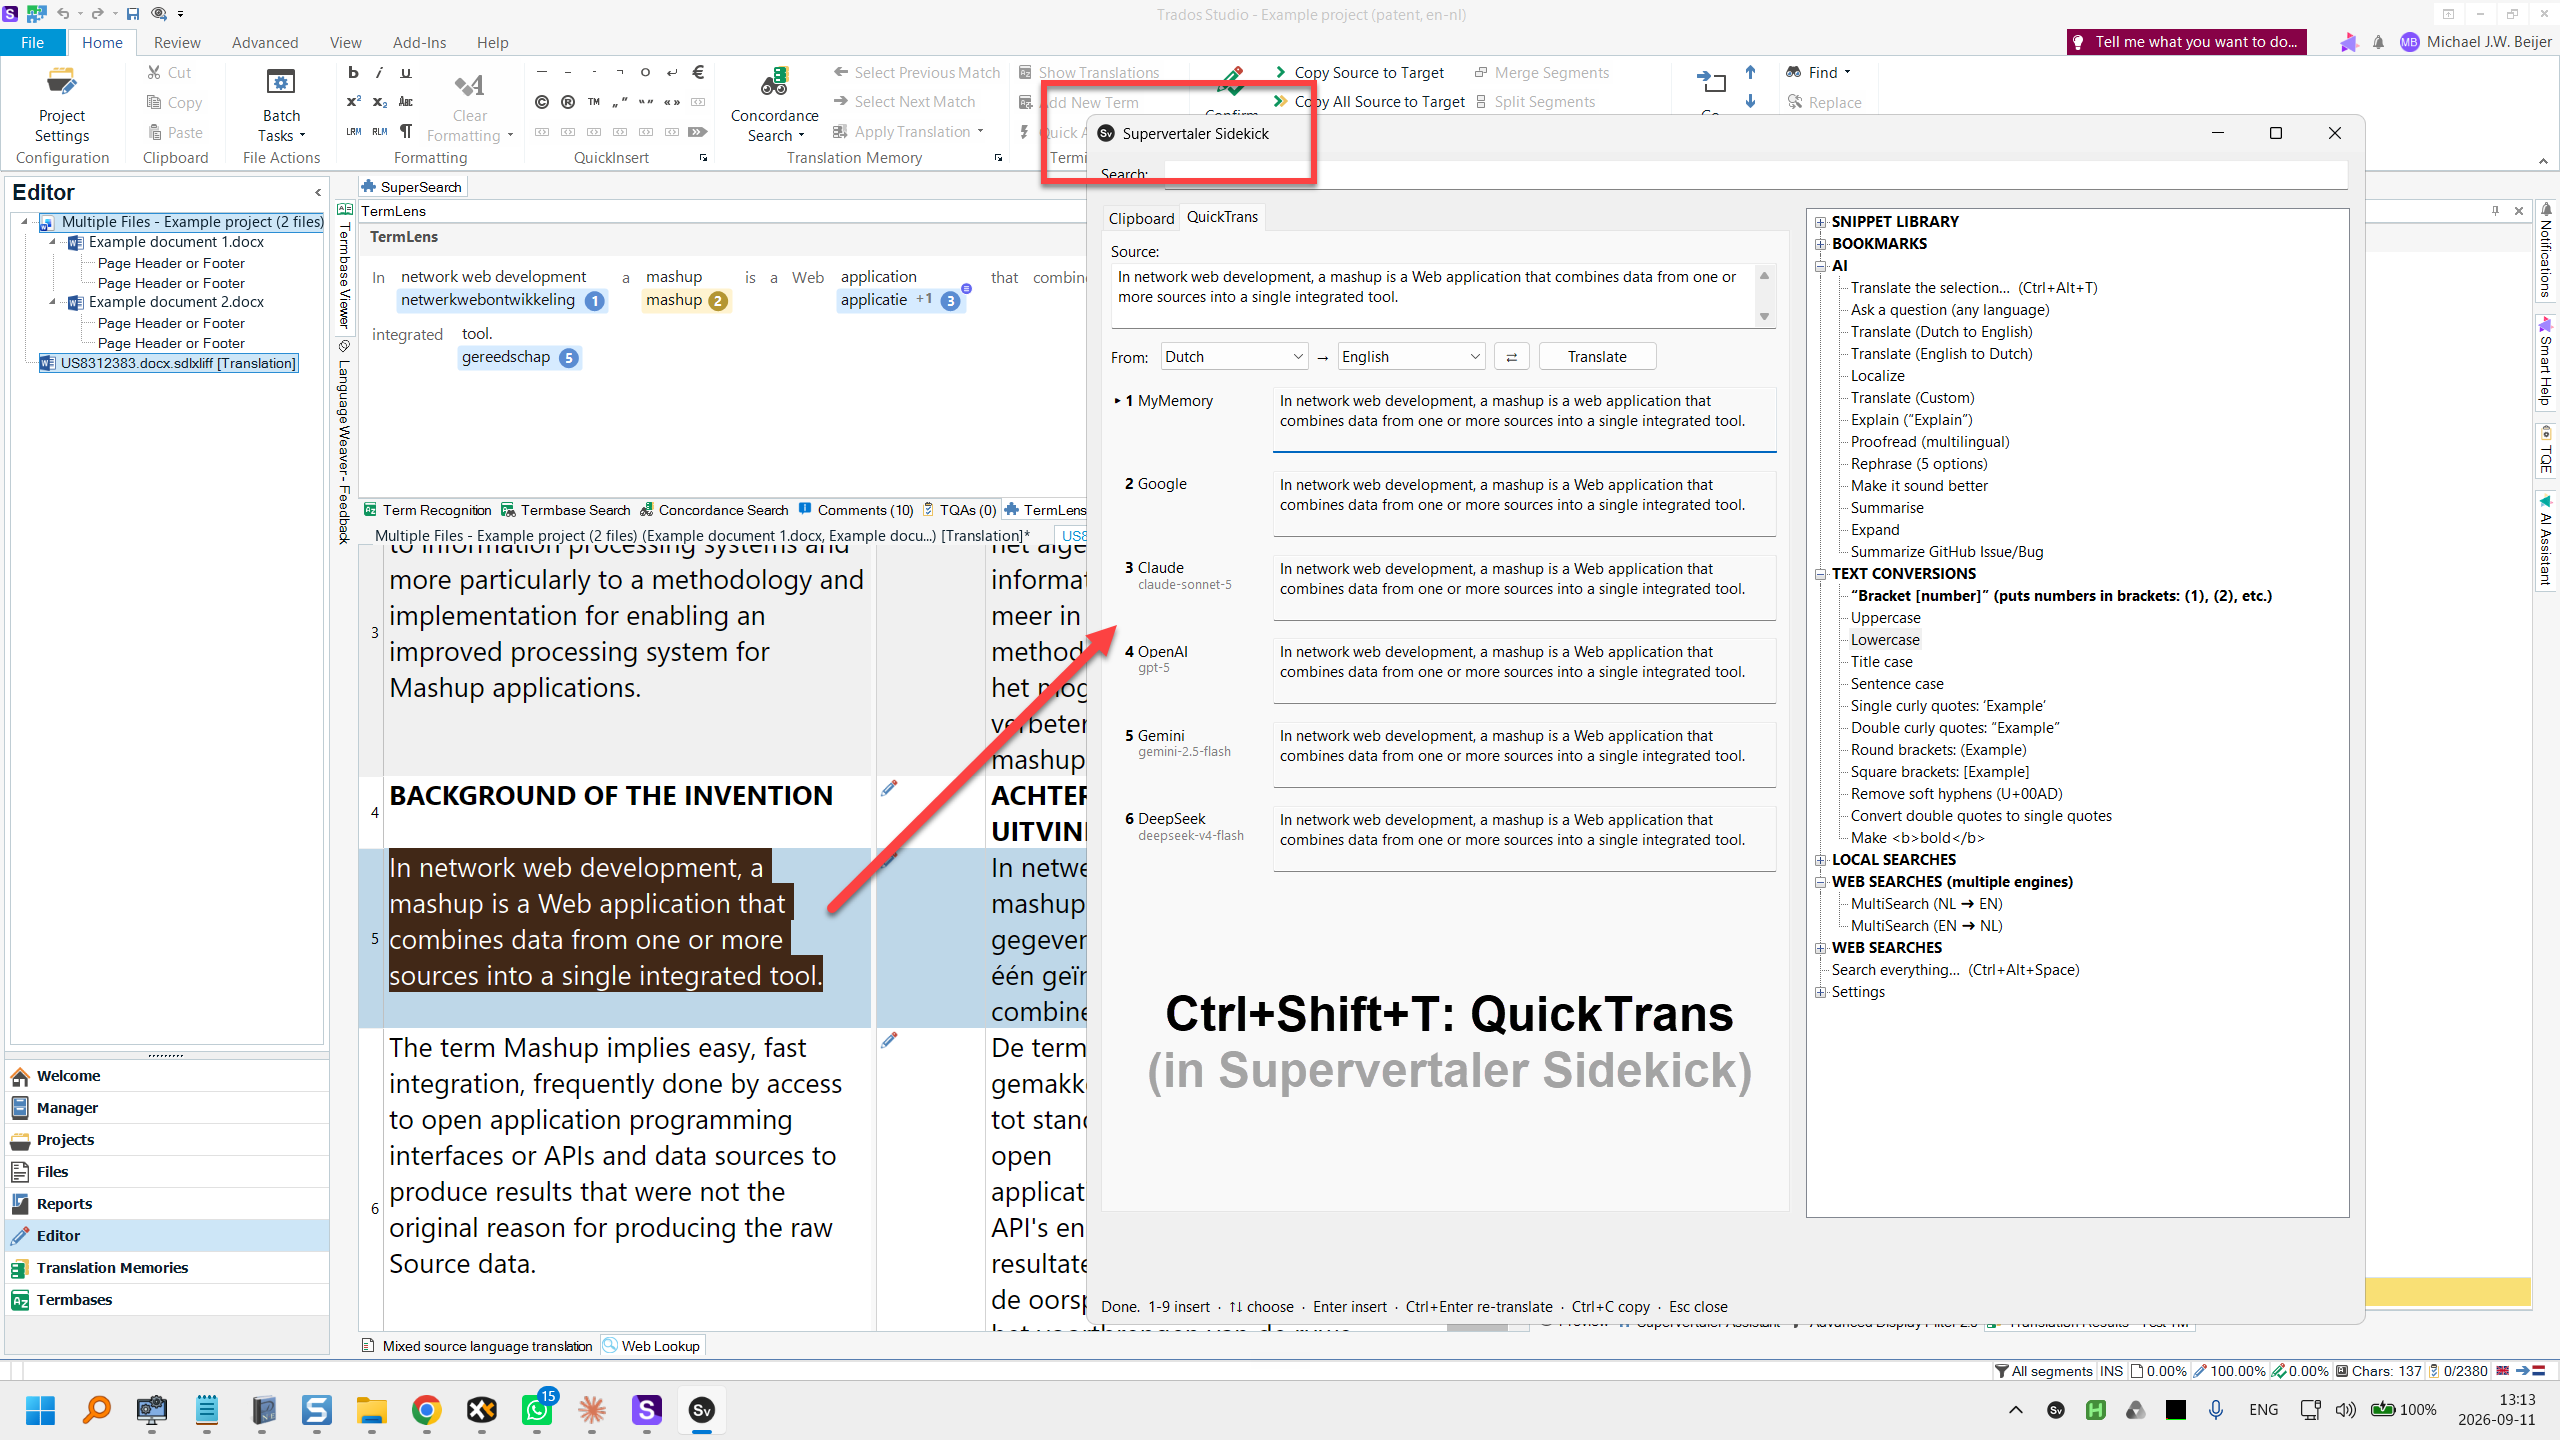 ### What it does **One window.** `` ` `` opens your clipboard history and the menu side by side. Arrow keys cross between them, folders open and close, and typing filters both panes at once. See [The window and the palette](/sidekick/window/). **The palette.** `Ctrl+Alt+Space` puts one search box over *everything* – clipboard history, snippets, searches, AI prompts, bookmarks and conversions. Type a few letters, press Enter. **Clipboard history.** Searchable, survives restarts, and pastes straight back into the window you came from. Entries you have already used are ticked and greyed, so you can work down a list of terms without losing your place. See [Clipboard history](/sidekick/clipboard/). **QuickTrans.** The selection translated by several engines at once – MyMemory, Google, Microsoft, ModernMT and DeepL for machine translation; Claude, OpenAI, Gemini, Mistral, DeepSeek, OpenRouter, a local Ollama or any OpenAI-compatible endpoint for LLMs. Press a number to insert the one you like. See [QuickTrans](/sidekick/quicktrans/). **AI actions.** Any prompt over the selection: translate, proofread, rephrase, summarise, expand, localise, explain. Every prompt is yours to edit. See [AI actions](/sidekick/ai-actions/). **Web and local searches.** Select a term, pick a source – IATE, Juremy, Linguee, ProZ, Reverso, BabelNet, Wikipedia, Wiktionary, Google Patents and more, or a whole batch at once in a fresh browser window. Every source follows the language pair you set, so one entry serves every direction, and a language pack adds everything for your pair in one click. See [Web and local searches](/sidekick/searches/). **Snippets, bookmarks and text conversions.** Boilerplate, standard replies, special characters and regex patterns inserted at the cursor; sites and folders you keep reopening; upper, lower, title and sentence case, curly quotes, brackets, HTML bold. See [Snippets, bookmarks and conversions](/sidekick/library/). **Text expansion.** Type an abbreviation, get the full text – thousands of entries with no cost per keystroke. See [Text expansion](/sidekick/text-expansion/). **Keyboard shortcuts that fit your hands.** Every built-in key can be changed, given a second key or limited to one program, and you can attach a key to anything the menu does. A key can even be a double tap of Ctrl. See [Keyboard shortcuts](/sidekick/keyboard-shortcuts/). ### Who it is for Anyone who translates and would rather not leave the window they are working in. Set your language pair once and the searches, the batch lookup and QuickTrans all follow it. The sources for your pair come as a language pack, one click to install – Dutch ⇄ English so far; every source is one editable entry, and a pack for another pair is one small file. Sidekick is built in [AutoHotkey v2](https://www.autohotkey.com/docs/v2/). Nothing personal lives in the program: your snippets, bookmarks, prompts and keys stay in a data folder on your own machine. ### Where to start * [Installation](/sidekick/installation/) – the installer, API keys, and running it from the source * [The window and the palette](/sidekick/window/) – the two ways in * [Clipboard history](/sidekick/clipboard/) – the feature you will use most * [Settings and files](/sidekick/settings/) – where everything lives
# AI actions
An AI action runs a prompt of your own over whatever text you have selected, in any application, and shows the answer. The prompts are ordinary menu entries, so they sit beside your snippets and searches, are edited in the same [Library Editor](/sidekick/library/#the-library-editor), and can have keyboard shortcuts attached. The starter set covers the everyday ones: ask a question in any language, explain, proofread, rephrase with five options, make it sound better, summarise and expand. For translation there is [QuickTrans](/sidekick/quicktrans/), at the top of the same section. Every one of them is a few lines you can change. ### Writing one In the Library Editor, add an entry of kind **AI** and give it a prompt: ```json { "kind": "ai", "label": "Translate (Dutch to English)", "prompt": "Give ten possible translations, technical to general.", "effort": "high" } ``` The selection is appended to the prompt. Optional per-entry overrides: `system` (a system prompt), `provider`, `model`, `effort` (`low`, `medium`, `high`, `xhigh`, `max` – Anthropic only) and `maxtokens`. Anything not set comes from the `[AI]` section of `settings.ini`, where the provider and model are the ones chosen in the window below. ### Providers Open **Settings → AI providers & keys…**. The line at the top, **AI menu actions use:**, picks which provider and model answer your AI actions: Claude (Anthropic), OpenAI, Gemini, Mistral, DeepSeek or OpenRouter, and a model. The model list is the one that provider’s row further down has – the few models worth recommending, and everything your key can use once **Models** or **Show all models** has asked. Leave the model blank for the provider’s default; the empty box says which that is. A model you typed by hand stays as you typed it. Click **Save** and the next AI action uses your choice – there is no need to reload Sidekick. The provider needs a key: if it has none, or its key can’t be read on this computer, the window says so and keeps the provider you had, so your AI actions don’t stop working. Paste the key into that provider’s row and click **Save** again. Keys live in the shared key file – see [Installation](/sidekick/installation/#4-add-api-keys). An AI action whose entry names its own `provider` or `model` keeps it, whatever the window says. Requests do not block. The rest of Sidekick keeps working while an answer is on its way. ### Sharing prompts with the Trados plugin Supervertaler for Trados keeps its prompts in a [library](/trados/settings/prompts/) with [QuickLauncher](/trados/quicklauncher/) shortcuts. Sidekick’s AI actions are the same idea outside the CAT tool, and today they are a separate list. Letting the two share one prompt library, so a prompt written for the Trados editor is also on the Sidekick menu, is planned. ### The answer The answer opens in a window of its own, formatted: headings, **bold** and *italic* text, bullet and numbered lists, tables, code, and sub- and superscript (H₂O, m²) appear as the AI meant them, rather than as Markdown’s `#`, `**` and `-` marks. Error messages are shown exactly as they arrive. * **Copy** puts the whole answer on the clipboard in two forms: as plain text without the Markdown marks – what Trados, memoQ, a browser or Notepad paste – and formatted, which is what Word pastes. * **Insert & close** types the answer, as plain text, where your selection was. * **Retry** asks again; **Close** or Esc closes the window. * To copy part of the answer, select it with the mouse and press Ctrl+C. Right-click for **Copy**, **Select all** and **Copy as Markdown** – the answer exactly as the AI wrote it, marks and all, for when the marks belong in the text (when you are translating a Markdown file, say). In the plain text, bullets become • (◦ one level in), numbered lists keep their numbers, and a table’s cells are separated by ” | ”.
# Clipboard history
Sidekick watches the clipboard and keeps a searchable history of everything you copy. The history survives restarts, and any entry can be pasted straight back into whatever window you came from. It is text only. Image clips were left out deliberately: for translation work the history that matters is text, and AutoHotkey has no workable way to thumbnail and persist pictures. ### Using it The history is the left pane of the [window](/sidekick/window/) (`` ` ``), and it also has a window of its own on `Ctrl+Alt+C`. The two don’t use quite the same keys. In the clipboard window (`Ctrl+Alt+C`): | Key | Does | | ------------------------------------ | ----------------------------------------------------- | | `↑` `↓`, `PgUp` `PgDn`, `Home` `End` | move | | typing | filters the list | | `Enter` | paste the selected clip into the window you came from | | `Ctrl+Enter` | copy it to the clipboard without pasting | | `Alt+1`–`9` | paste the first, second, third… clip straight away | | `Ctrl+Delete` | delete the selected clip | | `Esc` | close | In the main window’s history pane, `↑` `↓`, `Home` `End`, typing and `Enter` work as above, but `Ctrl+C` copies the selected clip without pasting, and `Alt+1`–`9` jumps to a section of the menu instead of pasting a clip (see [The window and the palette](/sidekick/window/)). `PgUp` `PgDn` and `Ctrl+Delete` work only in the clipboard window. **Ticks.** A clip you have pasted is ticked and greyed in the list. Copy a column of terms, then work down the list pasting each one where it belongs: the ticks show how far you have got. The most recent clips are also listed on the classic popup menu under **Recent clips**. ### Pausing capture **Settings → Pause / resume clipboard capture** stops recording until you switch it back on, for the moments you would rather nothing was kept. The setting is remembered across restarts. ### Privacy Three settings in `settings.ini`, under `[Clipboard]`, keep the history from holding things it should not: | Setting | Does | | ------------------- | ------------------------------------------------------------------------------------------------------------------------------------------------------------------------------------------------------------------------------------------------------------------------------------------------------- | | `ExcludedApps` | Never record anything copied while one of these programs is in the foreground. Pipe-separated process names – the obvious use is password managers, e.g. `keepassxc.exe\|1password.exe\|bitwarden.exe`. Empty by default, so that a URL you copy out of your password manager does not silently vanish. | | `AutoDeleteMinutes` | Discard entries older than this many minutes. `0`, the default, keeps them until you delete them. | | `MaxItems` | How many entries to keep; the oldest fall off the end. Default `200`. | Everything is stored in the `data\` folder next to Sidekick, on your own disk. Nothing is sent anywhere. See [Settings and files](/sidekick/settings/).
# Installation
Sidekick comes with an installer. It takes a minute, needs no administrator rights, and brings everything Sidekick runs on with it, so there is nothing to install first. ### 1. Download the installer [Download Supervertaler-Sidekick-Setup.exe](https://github.com/Supervertaler/Supervertaler-Sidekick/releases/latest/download/Supervertaler-Sidekick-Setup.exe) – the link always gives the newest version. Earlier versions, and what changed in each, are on the [releases page](https://github.com/Supervertaler/Supervertaler-Sidekick/releases). ### 2. Run it Windows may stop it with *Windows protected your PC*. That is because the installer is not signed yet, not because anything is wrong with it: click **More info**, then **Run anyway**. ### 3. Choose a folder The installer asks where Sidekick should go, and suggests a `sidekick` folder inside your Supervertaler data folder: `C:\Users\\Supervertaler\sidekick`, or the same inside wherever you moved that folder. Your own menu, clipboard history, notes and settings are kept there too, so choose somewhere you will find again. A folder under *Program Files* is refused, because Sidekick saves into its own folder and Windows does not let programs write there. Leave **Start Sidekick when I sign in to Windows** ticked unless you would rather start it from the Start menu yourself, and finish. Sidekick’s icon appears in the system tray – behind the **^** by the clock if Windows has tucked it away – and `` ` `` (backtick) opens the window. On first run Sidekick copies a starter menu into its `data` folder and opens with a working set of searches, conversions and AI prompts. From there you make it yours – see [Snippets, bookmarks and conversions](/sidekick/library/). ### 4. Add API keys Most of Sidekick works without any key. Clipboard history, snippets, searches, conversions and text expansion need nothing, and QuickTrans translates through MyMemory out of the box. The AI actions and the other translation engines want a key for each provider you use. Open the menu, go to **Settings → AI providers & keys…**, and paste each key beside its provider. Each engine’s model list opens on the few models worth recommending; **Models**, or **Show all models**, adds everything your key can use, so you are never guessing at a model name. Keys go into the file that all Supervertaler products share, `C:\Users\\Supervertaler\settings\api-keys.json` – or the `settings` folder inside wherever you moved your Supervertaler data folder. A key you have already set in Supervertaler for Trados or Supervertaler for memoQ is picked up here without retyping, and the reverse. See [Settings and files](/sidekick/settings/). ### Updating Run the installer for the newer version – the same download link. It closes Sidekick, replaces the program and starts it again, in the folder you chose the first time. Your `data` folder and `settings.ini` are never part of the installer, so an update cannot touch your content. ### Uninstalling In Windows Settings, go to **Apps → Installed apps → Supervertaler Sidekick → Uninstall**. That removes the program, its Start menu entry and the sign-in shortcut. Your `data` folder and `settings.ini` stay where they were, in case you reinstall, and the uninstaller says where that is; delete the folder if you do not want them. ### Running it from the source Sidekick is an [AutoHotkey v2](https://www.autohotkey.com/) script, and the installer is that script with its own copy of AutoHotkey beside it. If you already use AutoHotkey, or want to change the script itself, you can run it straight from the repository instead: 1. Install AutoHotkey **version 2.0 or later** from [autohotkey.com](https://www.autohotkey.com/). Sidekick does not run on the older v1. 2. Clone [github.com/Supervertaler/Supervertaler-Sidekick](https://github.com/Supervertaler/Supervertaler-Sidekick), or download it as a zip (the green **Code** button → **Download ZIP**) and unpack it somewhere permanent. 3. Double-click `Sidekick.ahk`. To start it with Windows, put a shortcut to it in your Startup folder: press `Win+R`, type `shell:startup`, press Enter, and drop the shortcut in. To update, pull the repository or unpack a fresh zip over the old folder, then choose **Settings → Reload Sidekick**. Do not run an installed copy at the same time: the two would claim the same keys.
# Keyboard shortcuts
A shortcut is a key to press and something for it to do. Sidekick has a built-in set, and every key in it can be changed, given a second key, or limited to one program. You can also attach a key to anything the menu does. All of it is set in **Settings → Keyboard shortcuts…**; nothing needs an ini file. ### The built-in shortcuts | Does | Default key | | ---------------------------------------- | -------------------------------------------------------- | | Open the palette (search everything) | `Ctrl+Alt+Space` | | Translate the selection (QuickTrans) | `Ctrl+Alt+T` | | Jot a note (Scratchpad) | `Ctrl+Alt+N` | | Open the window (clipboard + menu) | `` ` `` (backtick) | | Classic popup menu | `Ctrl` + `` ` `` (backtick) | | Clipboard history | `Ctrl+Alt+C` | | Library Editor | none | | Google the selection | `Ctrl+/` | | Search the desktop (dtSearch) | none – `Ctrl+Shift+D` is a good key if you have dtSearch | | Confirm segment (presses Ctrl+Enter) | `Numpad Enter`, in memoQ and Trados Studio only | | Type a euro sign (€) | `Ctrl+Shift+3` | | Type an en dash (–) | `Ctrl+Shift+6` | | Type an em dash (—) | `Ctrl+Shift+-` | | Type an opening single quote (‘) | `Ctrl+Shift+9` | | Type a closing single quote (’) | `Ctrl+Shift+0` | | Single curly quotes around the selection | `Ctrl+Shift+'` | | Type a bullet and a space (• ) | `Ctrl+Shift+O` | | Type a backtick | `` Ctrl+Shift+` `` | | Reload Sidekick | none – it is in the menu, under **Settings** | The character keys type what a keyboard has no key for. They work in every program, so one may take over a key a program of yours uses – in Word, `Ctrl+Shift+-` is a non-breaking hyphen. Change that key, limit it to the programs you want it in, or turn it off. A backtick needs a key of its own because the backtick itself opens the window. **Confirm segment** is there because memoQ and Trados both confirm with Ctrl+Enter, which is two hands. Numpad Enter is one. It is limited to those two programs, so Numpad Enter keeps its normal meaning everywhere else. ### Changing a key Select a row, press **Change key…**, and press the combination you want. Sidekick refuses a combination Windows will not accept rather than saving one that silently does nothing. **Turn off** frees a key; **Reset to default** puts it back. **Add another key…** keeps the keys a shortcut has and adds one more. If the existing keys are limited to particular programs, you are asked whether the new one should be too – usually the point, since a global key that presses Ctrl+Enter would send half-written emails. ### Double-tap keys A key can be a quick double tap of Ctrl, Shift or Alt. In the “Press a shortcut” dialog, tap the modifier twice within about half a second and it is recorded as, for example, “Ctrl twice”. The modifier keeps working normally: Ctrl+C followed by a tap does not count, and a triple tap fires once. Tapping Ctrl twice to confirm a segment in memoQ or Trados is the obvious use: select **Confirm segment**, press **Add another key…**, tap Ctrl twice, answer **Yes** to limit it to the same programs, save. ### Your own shortcuts **New shortcut…** attaches a key to something of your own. Give it a name, choose what it does, and press the key: | Kind | Does | | -------------------------------- | ------------------------------------------------------------ | | Press keys | sends a key combination – `^{Enter}` is Ctrl+Enter | | Type text | types the text, for a character or phrase you use constantly | | Surround the selection | wraps the selection, e.g. in `` and `` | | Search the web for the selection | opens a URL with `{q}` replaced by the selection | | Open a web page | a bookmark on a key | | Run a program | launches a file or folder | | Run a built-in action | any of the actions the menu uses, such as a case conversion | The **Does** column of the list says what each shortcut will do, in words, so a list of forty keys stays readable. ### In settings.ini The same bindings are stored under `[Hotkeys]` in `settings.ini`, in AutoHotkey notation: `^` is Ctrl, `!` Alt, `+` Shift, `#` Win. Several keys are separated by `|`, a key is limited to a program with `@`, and a double tap is `DoubleCtrl`, `DoubleShift` or `DoubleAlt`: ```ini ConfirmSegment=NumpadEnter@ahk_exe memoQ.exe|DoubleCtrl@ahk_exe memoQ.exe ``` You never need to write this yourself; the window does it. It is here for anyone who keeps their settings in version control.
# Snippets, bookmarks and conversions
Everything on Sidekick’s menu is data. The menu is built when Sidekick starts from `data\menu.json`, a file that stays on your machine, and the **Library Editor** changes it without touching the program. ### Snippets Text inserted at the cursor: boilerplate, standard replies, special characters, regex patterns, dictionary citations. The starter set has an HTML section, twenty-eight special characters (en and em dashes, arrows, primes, accented vowels, subscripts and superscripts, non-breaking space, ™ ® © and so on) and a couple of regex patterns. Pick one from the menu or type its name into the [palette](/sidekick/window/#the-palette--ctrlaltspace). ### Bookmarks Web addresses and local files or folders you keep reopening: forums, documentation, reference sites, client folders. ### Text conversions Act on the selection and paste the result back: upper, lower, title and sentence case; single and double curly quotes; round and square brackets; remove soft hyphens; convert double quotes to single; HTML bold. Handy for technical translators who spend their day tidying other people’s text. ### The Library Editor Open **Settings → Edit library…** (or press the key you give it – see [Keyboard shortcuts](/sidekick/keyboard-shortcuts/)). The tree on the left mirrors the menu: its headings become sections, submenus hang under them, and every entry – snippet, search, AI prompt, bookmark, conversion – is reachable. Add, edit, delete and reorder; press **Save & rebuild** and the menu updates without a restart. ### Entry types Each entry has a kind that decides what it does with the selection: | Kind | What it does | | ---------------------- | --------------------------------------------------------------------------------------------------------------------------------------- | | `text` | types out literal text | | `keys` | sends a key combination, e.g. `^+*` | | `url` | opens a web address | | `run` | launches a file or folder | | `search` | looks the selection up at a URL, with `{q}` replaced by it and `{sl}`/`{tl}` by the language pair – see [Searches](/sidekick/searches/) | | `multisearch` | opens several search URLs at once in a new browser window – see [Searches](/sidekick/searches/#multisearch--a-batch-at-once) | | `ai` | runs an AI prompt over the selection – see [AI actions](/sidekick/ai-actions/) | | `action` | calls a built-in function, such as a case conversion | | `submenu` | holds other entries | | `heading`, `separator` | structure only | The file is plain JSON, so it can also be edited by hand, kept in version control, or copied to another machine.
# QuickTrans
QuickTrans translates the selection with several engines at once and shows the answers side by side. Select a sentence in any application, press `Ctrl+Alt+T`, and pick the version you like. It is a tab of the main [window](/sidekick/window/), so the menu stays beside the translations: translate something, insert it, then run a menu action without changing windows. 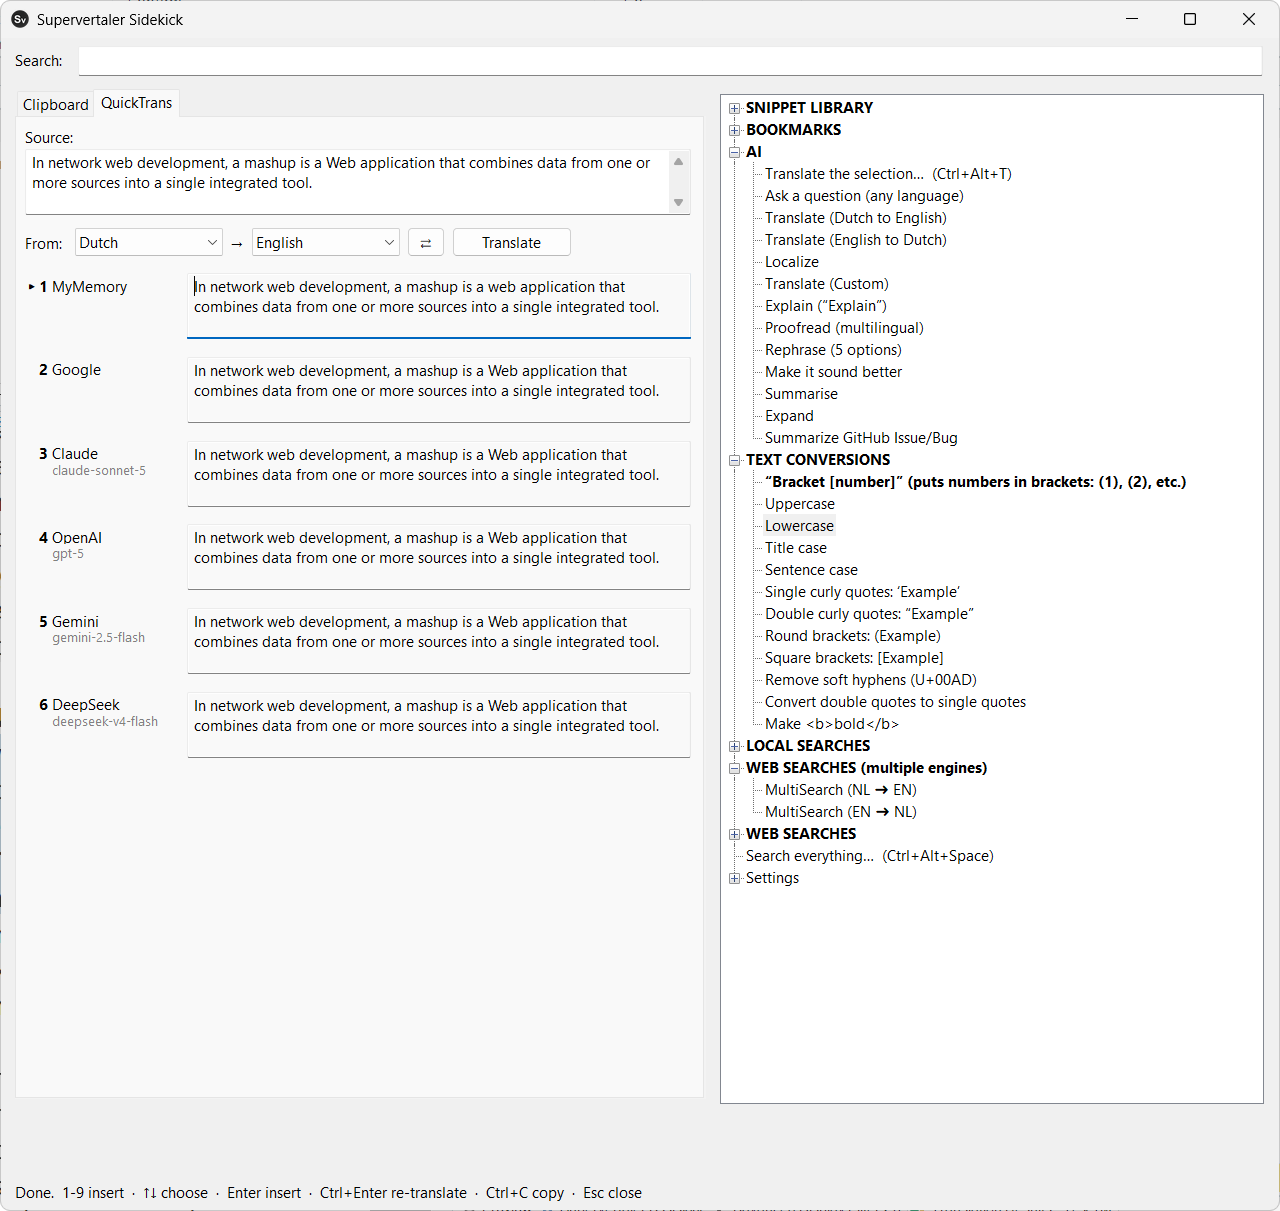 ### Engines Machine translation: **MyMemory**, **Google**, **Microsoft**, **ModernMT** and **DeepL**. LLMs: **Claude**, **OpenAI**, **Gemini**, **Mistral**, **DeepSeek**, **OpenRouter**, a local **Ollama**, and any **custom** OpenAI-compatible endpoint you point it at. Every engine is asked at the same time, and each answer appears as it lands, so nothing waits for the slowest. MyMemory needs no key, so QuickTrans does something useful before anything is configured; the rest read their key from the shared key file and are skipped silently when it is missing. An engine whose key is there but can’t be read on this computer is not skipped: its row says so, and nothing is sent to it (see [Settings and files](/sidekick/settings/#cant-be-read-on-this-computer)). See [Installation → Add API keys](/sidekick/installation/#4-add-api-keys). ### Using it | Key | Does | | ------------------ | ---------------------------------------------------------------------- | | `1`–`9` | insert that translation into the window you came from | | `Ctrl+Enter` | translate again (after editing the source text or changing a language) | | `Ctrl+Shift+Enter` | ask the AI engines | | `Ctrl+C` | copy the selected translation | | `Ctrl+=` `Ctrl+-` | larger or smaller text; `Ctrl+0` goes back to 9 pt | | `Esc` | close | The **From** and **To** dropdowns set the language pair for the whole program – the [searches](/sidekick/searches/#the-language-pair) read it too – and the choice is remembered in `settings.ini`. The ⇄ button swaps the direction. ### Text size The small **−** and **+** at the right end of the **Source** line make the text larger or smaller, as `Ctrl+-` and `Ctrl+=` do. What changes is the text you read and write – the source box and the translations, and the note on the Scratchpad tab – while the labels, the buttons, the clipboard list and the menu stay as they are. Each translation still gets as many lines as it needs at any size. The size is remembered, so a laptop screen and a large monitor can each keep their own. ### Machine translation first, AI when you ask The machine-translation engines answer straight away and cost nothing or next to nothing. The LLMs are slower and metered. By default QuickTrans asks all of them with every translation; once you have several LLMs enabled that means every selection queries all of them. Set `AutoFetchAI=0` under `[QuickTrans]` in `settings.ini` and the AI engines wait for `Ctrl+Shift+Enter` instead – you only pay for an LLM when the free answers were not good enough. ### Choosing models Open **Settings → AI providers & keys…** to switch engines on and off and to choose a model for each. Each model list has two tiers, as in Supervertaler for Trados: * **The short list** – the few models worth recommending for that engine, the same ones the Trados plugin shows. This is what the dropdown opens on, and picking one shows its verdict and price at the bottom of the window. * **Everything else** – tick **Show all models** and Sidekick asks each provider what your key can use and adds the rest to every list. **Models** beside an engine does the same for that engine alone. A provider’s full list runs to dozens of dated versions and previews, which is why it is not the default. You can also type a model name the lists do not have. For one-sentence translation the cheaper models are the sensible choice – as good as the flagship at this job, faster and far cheaper, and you are paying several engines at once. ### Local and custom endpoints Ollama defaults to `http://localhost:11434/v1`. A custom endpoint stays off until you give it a URL and a model name. Most custom endpoints are MT proxies rather than instruction-following models – they translate whatever they are sent, so a wrapped prompt comes back with the instructions translated too. `custom_raw=1`, the default, sends the bare text with the language direction in the system message; set it to `0` if yours really is an LLM.
# Web and local searches
Select a term, open the menu, pick a source: the term is looked up there in your browser, in the language pair you are working in. That is a search entry. The starter menu has the sources that work for any language – IATE, Juremy, Linguee, ProZ, Reverso, BabelNet, AcronymFinder, Microsoft Terminology, Wikipedia, Wiktionary, Google Patents and Google itself – and [language packs](#language-packs) add the ones that belong to one language. ### The language pair One pair serves the whole program: the searches and [QuickTrans](/sidekick/quicktrans/) both read it, and the tray icon’s tooltip shows it. Set it in any of three places: * the **From** and **To** dropdowns in the QuickTrans tab of the [window](/sidekick/window/) * **Settings → Language pair…**, a small dialog with the same two dropdowns * **Settings → Swap languages**, which flips the direction – put it on a [key](/sidekick/keyboard-shortcuts/) if you work both ways Change it once and every search follows. An IATE lookup is one menu entry whether you translate Dutch to English or German to French. ### A search is one line Adding a source of your own is one entry in the [Library Editor](/sidekick/library/#the-library-editor): a label and an address with placeholders where the term and the languages go. ```json { "kind": "search", "label": "IATE", "url": "https://iate.europa.eu/search/byUrl?term={q}&sl={sl}&tl={tl}" } ``` | Placeholder | Becomes | For Dutch → English | | ------------------------- | ----------------------------------------------- | ------------------- | | `{q}` | the selected text, percent-encoded | `warmtewisselaar` | | `{sl}` `{tl}` | two-letter codes | `nl` `en` | | `{sl_upper}` `{tl_upper}` | the same in capitals | `NL` `EN` | | `{sl_full}` `{tl_full}` | the language’s English name | `dutch` `english` | | `{sl3}` `{tl3}` | three-letter codes (ISO 639-2/T) | `nld` `eng` | | `{sl3b}` `{tl3b}` | three-letter codes, bibliographic (ISO 639-2/B) | `dut` `eng` | Most sites take the two-letter codes. Reverso and Linguee want names, Juremy wants `nld`, ProZ wants `dut`; the starter entries show which is which. The placeholders are the ones SuperLookup used, so a resource list from there transfers unchanged. The selection is percent-encoded before it is substituted, so terms containing `&`, `?`, `+` or accented characters work. Any site whose search results have their own URL can be a source, and a key in [Keyboard shortcuts](/sidekick/keyboard-shortcuts/) makes the lookup one keystroke from anywhere. **Sites with no code in the URL.** Some sites bake the pair into an opaque id – Van Dale, for example, names its Dutch–English and English–Dutch dictionaries `gne` and `gen`. There is no placeholder for those, so such an entry carries one address per direction instead, under `by_pair`: ```json { "kind": "search", "label": "Van Dale (Dutch/English)", "by_pair": { "nl-en": "https://zoeken.vandale.nl/?dictionaryId=gne&query={q}", "en-nl": "https://zoeken.vandale.nl/?dictionaryId=gen&query={q}" } } ``` When the current pair is not in the list, the entry says so rather than opening the wrong dictionary. ### MultiSearch – a batch at once **MultiSearch** opens a whole set of sources in one go, each in its own tab of a fresh browser window, for the current pair. Read down the tabs, close the window, done. The starter batch, at the top of Web searches, is eleven sources: Google Patents, IATE, ProZ, Beijer Dictionary, Reverso, Juremy, Linguee, Wikipedia, Wiktionary, AcronymFinder and BabelNet. A language pack brings its own batch for its pair. It is an entry of kind **multisearch** in the Library Editor: one address per line, the same placeholders. Make as many batches as you like – one for legal, one for engineering – and give each a key. The window opens in your default browser. Chrome, Edge, Brave and the other Chromium browsers open the whole batch in one new window; Firefox opens the first in a new window and the rest as tabs in it. Anything else gets the tabs in the current window. ### Language packs A **language pack** is everything for one language pair, both directions: the bilingual sites, the monolingual dictionaries on either side, and a MultiSearch that opens them all at once. A Dutch and English translator installs **Dutch ⇄ English** and has the lot; a Dutch and German translator installs **Dutch ⇄ German** and nothing else. The installed pack for the pair you are working in appears as one folder at the top of **Web searches**, named after the pair – “Dutch ⇄ English (language pack)” – so a translator with several installed sees the right one after switching the pair. **Settings → Language packs…** lists the packs Sidekick ships, one checkbox each. Until you save that dialog, the pack for your current pair is installed automatically if there is one, so a fresh install with Dutch → English gets Dutch ⇄ English without being asked. Pack entries are never written into your menu, so removing a pack is one untick, and the Library Editor only ever shows your own entries. Sidekick ships Dutch ⇄ English today, with thirteen sources: a MultiSearch over the pair, Beijer Dictionary, Mijnwoordenboek, Woordenlijst, Synoniemen.net, Encyclo, Merriam-Webster, Cambridge, Collins, OneLook, Thesaurus.com, Wordnik and Ludwig. A pack is a small JSON file in the `packs\` folder of the Sidekick folder, in exactly the format of a search entry, so a pack for another pair is a matter of writing one – and contributing it back on GitHub so the next translator in that pair starts with it. ### Local searches * **Google the selection** – `Ctrl+/` * **Search the desktop** – hands the selection to dtSearch, if you have it. It has no key until you give it one in [Keyboard shortcuts](/sidekick/keyboard-shortcuts/); `Ctrl+Shift+D` suits it Every search opens in your default browser. ### Other language pairs Every source is pair-aware, so a German-to-English translator sets the pair once and the starter sources just work – IATE, Linguee, ProZ, Reverso, Juremy, BabelNet, Wikipedia and Wiktionary all cover it. The pair’s own sources come from a [language pack](#language-packs); Dutch ⇄ English exists, and more are welcome.
# Settings and files
Sidekick keeps everything in two places: its own folder – the one you chose when installing, `C:\Users\\Supervertaler\sidekick` unless you picked another – and the key file it shares with the other Supervertaler products. Sidekick itself writes nothing to the registry or to AppData. The installer adds only what any installed program has: a Start menu entry, a sign-in shortcut if you asked for one, and its line in Windows’ list of installed apps. ### The Sidekick folder | | | | ---------------------- | ---------------------------------------------------------------------------------------------------------------------------------------- | | `Sidekick.ahk`, `lib\` | the program | | `AutoHotkey\` | the AutoHotkey that runs it, in an installed copy – see [Running it from the source](/sidekick/installation/#running-it-from-the-source) | | `data\` | **your content** – the menu, clipboard history, shortcuts, text expansions. Never overwritten by an update. | | `data.example\` | the starter set, copied into `data\` on first run | | `settings.ini` | your settings, written as you change them; anything it does not mention is at its default | | `settings.example.ini` | the documented template – every setting, with a comment saying what it does | | `packs\` | the language packs, one JSON file per language pair – see [Searches](/sidekick/searches/#language-packs) | Inside `data\`: | File | Holds | | ----------------- | -------------------------------------------------------------------------------------------------------- | | `menu.json` | the menu: snippets, bookmarks, AI prompts, searches, conversions – see [the library](/sidekick/library/) | | `shortcuts.json` | the shortcuts you made yourself – see [Keyboard shortcuts](/sidekick/keyboard-shortcuts/) | | `expansions.json` | text expansions – see [Text expansion](/sidekick/text-expansion/) | | `clipboard.json` | clipboard history | All plain JSON. Copy the `data` folder and `settings.ini` into Sidekick’s folder on another computer and Sidekick is set up there. ### settings.ini Open it in any editor, or reach the parts that have a window through the menu: | Section | Holds | Window | | -------------- | -------------------------------------------------------------------------------------------------------------------- | ------------------------------------------------------------------ | | `[Hotkeys]` | the built-in shortcuts | **Settings → Keyboard shortcuts…** | | `[AI]` | provider, model and effort for AI actions | **Settings → AI providers & keys…** (provider and model) | | `[Keys]` | API keys (see below) | **Settings → AI providers & keys…** | | `[QuickTrans]` | which engines, which models, whether AI is fetched automatically, and the language pair (`SourceLang`, `TargetLang`) | **Settings → AI providers & keys…**, **Settings → Language pair…** | | `[Packs]` | which language packs are installed (`Installed=nl-en`); absent means the pack for the current pair | **Settings → Language packs…** | | `[Clipboard]` | capture on/off, size, expiry, excluded programs | **Settings → Pause / resume clipboard capture** | | `[Window]` | the main window’s size and position, written automatically | – | Changes to `settings.ini` made by hand take effect after **Settings → Reload Sidekick**. ### The shared API key file API keys are read first from the file all Supervertaler products share: ```plaintext C:\Users\\Supervertaler\settings\api-keys.json ``` If you moved your Supervertaler data folder, it is the `settings` folder inside that one. One key per provider, plain text. A key pasted into Supervertaler for Trados or Supervertaler for memoQ works in Sidekick, and one entered in Sidekick’s **AI providers & keys…** window is written there for the plugins. Sidekick’s machine-translation keys sit in the same file under their own names – note that `google` there is Google Translate, not Gemini. A key in `settings.ini` under `[Keys]` is used only when neither the shared file nor its locked copy (below) has one for that provider. ### Keys locked to this computer Each key Sidekick saves, and each key it finds in the shared file when it starts, is also kept in your Windows profile, locked by Windows so that it opens only for your Windows account: ```plaintext C:\Users\\AppData\Roaming\Supervertaler\api-keys.locked.json ``` Supervertaler for Trados and Supervertaler for memoQ read and write the same file. The shared `api-keys.json` is still written as before, so older versions keep working; a later version will stop keeping keys in the data folder. There is nothing to do. ### ”Can’t be read on this computer” A key that Windows will not unlock for you – one saved under another Windows sign-in, or one stored before an administrator reset your Windows password – is never shown as an empty box or sent to the provider. The **AI providers & keys…** window says so under that provider’s key box: > Your Anthropic key can’t be read on this computer – it was saved under another Windows sign-in, or your Windows password was reset. Paste the key in again; nothing else is affected. An AI action that needs the key stops with “Can’t use your Anthropic key – it can’t be read on this computer…” instead of calling the provider, and in QuickTrans that engine’s row says the same. Paste the key in again and click **Save**. Until you do, the unreadable copy is kept – leaving the box empty and clicking **Save** does not remove it – because some causes pass by themselves, such as a company network that cannot be reached yet after a password reset. If the file holding the locked keys is ever damaged, Sidekick keeps a copy of it beside the original (`api-keys.locked.damaged-…json`) and says so at the top of the **AI providers & keys…** window, asking you to paste your keys in again. While the shared file still holds your keys, they are locked again from there when Sidekick starts, so in practice only a key that an action reports as missing needs pasting. ### Where the tray icon went Sidekick lives in the system tray. Right-click its icon for the menu; if the icon is hidden, Windows has tucked it behind the **^** overflow arrow. The tray icon follows the taskbar’s light or dark theme.
# Text expansion
Type an abbreviation, get the full text. Text expansion watches what you type and replaces a short trigger with its expansion the moment you finish it – `adr` becomes your address, `ovw` becomes *overeenkomstig*, `tabb` becomes a tab character. It is not the same as a [text conversion](/sidekick/library/#text-conversions), which acts on text you have already selected. Expansion has no selection at all; it works on the keystrokes themselves. ### Editing expansions Open **Settings → Text expansions…**. Each row is a trigger and what it expands to. Add, edit and delete, then save: Sidekick reloads and the new entries are live. The entries live in `data\expansions.json`, alongside your other content. See [Settings and files](/sidekick/settings/). ### Built for thousands of entries This is the one feature that has to be fast on every keystroke of every day, and a working translator’s list grows into the thousands. Registering entries one by one at start-up would cost seconds; instead Sidekick writes the list out as a generated script when you save and includes it, so five thousand entries load in a few milliseconds and typing costs nothing. Editing costs one reload.
# The window and the palette
There are two ways into Sidekick. The **window** is for browsing: clipboard on the left, the menu as a tree on the right. The **palette** is for finding: one search box over everything. Both capture whatever text you had selected when they opened, so the thing you act on is the thing you were looking at. ### The window – `` ` `` Press `` ` `` (backtick) in any application and the window opens with the clipboard history focused, because that is what gets used most. The menu is on the right as a tree of sections – snippet library, bookmarks, AI, text conversions, searches – that you open and close. | Key | Does | | ---------------------------------------- | ------------------------------------------------------------ | | `↑` `↓` | move through the list you are in | | `→` | cross from the clipboard into the menu; open a folder | | `←` | close a folder, walk up, and cross back to the clipboard | | `Enter` | use the selected clip or run the selected menu entry | | `Tab` | switch between the two panes | | typing | filters both panes at once; `Ctrl+F` jumps to the search box | | `Alt+1`–`9` | jump straight to the first, second, third… menu section | | `Ctrl+↑` `Ctrl+↓` | step from section to section | | `Home` `End` | first and last entry | | `Ctrl+C` | copy the selected clip without pasting it | | `Ctrl+Tab`, `Ctrl+1`, `Ctrl+2`, `Ctrl+3` | switch between the Clipboard, QuickTrans and Scratchpad tabs | | `Ctrl+=` `Ctrl+-` `Ctrl+0` | larger text, smaller text, back to 9 pt | | `Esc` | close | Using a clip pastes it into the window you came from and ticks it in the list, so a list of terms can be worked through top to bottom without losing your place. See [Clipboard history](/sidekick/clipboard/). The second tab of the same window is [QuickTrans](/sidekick/quicktrans/). The menu stays beside it, so you can translate something, insert it, and run a menu action without changing windows. The third tab, **Scratchpad**, is a note: one box of plain text, saved as you type to `data\scratchpad.txt`. `Ctrl+Alt+N` opens the window there with the cursor at the end of the note, ready to type. **Opens on:**, at the right of the tab strip, chooses the tab the backtick opens on: Clipboard, QuickTrans, Scratchpad, or whichever you used last. The QuickTrans and Scratchpad shortcuts always open their own tab. **Text size** – `Ctrl+=` and `Ctrl+-`, or the **−** and **+** on the QuickTrans tab – changes the text you read and write: the note, the QuickTrans source box and the translations. The clipboard list, the menu and the labels stay the size they are. The size is remembered. ### The palette – `Ctrl+Alt+Space` The palette is one searchable list of everything Sidekick knows: clipboard history, snippets, searches, AI prompts, bookmarks and conversions in a single window. Type a few letters and it narrows; `↑` and `↓` move, `PgUp` and `PgDn` move ten at a time, `Enter` runs the entry, `Esc` closes. Use it when you know what you want. Use the window when you want to browse a category you cannot name yet. ### The classic popup menu – Ctrl + backtick The menu on its own, as a small popup at the mouse pointer, without the clipboard pane. Everything is reachable in two keystrokes: the shortcut, then the accelerator letter underlined in the entry. ### The menu’s sections What the menu contains is entirely yours to change – see [Snippets, bookmarks and conversions](/sidekick/library/). The starter set has these sections: * **Snippet library** – HTML fragments, special characters, regex patterns * **Bookmarks** – online and local * **AI** – prompts that run over the selection, and QuickTrans * **Text conversions** – case, quotes, brackets, soft hyphens, HTML bold * **Web searches** – terminology sources one at a time, or a whole batch * **Settings** – the language pair and language packs, the Library Editor, keyboard shortcuts, text expansions, AI providers and keys, pausing clipboard capture, and reloading